
Thursday, 28 February 2013
Things to photograph this weekend - Alphabet Photography
Need a simple project to focus you, but one that has lots of scope? Choose to illustrate the alphabet and interpret anyway you wish – photograph something beginning with each letter or hunt out letters themselves in our surroundings, or make the shape of letters with props. You’ll be constantly scanning your surroundings for photo opportunities and this will result in a better eye for photographs.
Monday, 25 February 2013
Understanding ISO in your digital camera
 |
| Aperture f4.0, Shutter Speed 40 seconds, ISO 3200 |
ISO (I.S.O.) is the abbreviation for the International Organization of Standardization, a governing body based in
In 35mm film photography ISO (or ASA) was the indication of how sensitive a film was to light. It was measured in numbers and you have probably seen them on the film boxes… there was ASA 100, 200, 400, 800 etc. The lower the number the lower the sensitivity of the film and the finer the grain in the shots you’re taking.
In Digital Photography there is only ISO. ISO measures the sensitivity of the image sensor. The same principles apply as in film photography – the lower the number the less sensitive your camera is to light and the finer the grain. Higher ISO settings are generally used in darker situations to get faster shutter speeds (for example an indoor sports event when you want to freeze the action in lower light) – however the cost is more digital noise (fine grain or colored spots) in your shots. 100 ISO is generally accepted as the ‘normal’ and will produce an image with very little noise/grain.
Most people tend to keep their digital cameras in ‘Auto Mode’ where the camera selects the appropriate ISO setting depending upon the conditions you’re shooting in (it will try to keep it as low as possible) but most cameras also give you the opportunity to select your own ISO. My suggestion, start with AUTO when you are very new with the digital camera, but start playing with setting your ISO settings to help master the exposure triangle of shutter speeds, aperture and ISO. It will give you mor efreedom and allow you to be more creative.
When you do override your camera and choose a specific ISO you’ll notice that it impacts the aperture and shutter speed needed for a well exposed shot. For example – if you bumped your ISO up from 100 to 400 you’ll notice that you can shoot at higher shutter speeds and/or smaller apertures in lower light situations.
When choosing the ISO setting I generally ask myself the following four questions:
1. Light – Is the subject well lit?
2. Tripod – Am I using a tripod?
3. Moving Subject – Is my subject moving or stationary?
If there is plenty of light, I want little grain, I’m using a tripod and my subject is stationary I will generally use a pretty low ISO rating. (50 or 100). However if it’s dark, I may want grain, or I don’t have a tripod and/or my subject is moving I might consider increasing the ISO as it will enable me to shoot with a faster shutter speed and still expose the shot well. Of course the trade off of this increase in ISO will be noisier shots.
Situations where you might need to push ISO to higher settings include:
· Indoor Sports Events – where your subject is moving fast yet you may have limited light available.
· Concerts – also low in light and often ‘no-flash’ zones
· Art Galleries, Churches etc- many galleries have rules against using a flash and of course being indoors are not well lit.
· Birthday Parties – blowing out the candles in a dark room can give you a nice moody shot which would be ruined by a bright flash. Increasing the ISO can help capture the scene.
· Shooting night landscapes – maybe you are shooting northern lights or stars.
ISO is an important aspect of digital photography to have an understanding of if you want to gain more control of your digital camera. Experiment with different settings and how they impact your images. The more you practice, the more you learn, the better you will become.
Below is a chart that I found that may help you with how adjustments of ISO, aperture and shutter speed have an effect on the outcome of your image.

Getting The Correct Exposure For Beginners
Having the correct exposure is about having enough light in a photo. Over-exposed photos are bright, harsh and can look washed out. Whereas under-exposed photos are too dark to pick up on details
Shutter speed, aperture and ISO work together to bring out a nicely exposed photo. The three combined are called the "Exposure Triangle". But how do you go about getting the right exposure while taking manual control over all three aspects of the exposure triangle?
Here are steps I usually take to decide on the right setting for the photo I’m trying to achieve.
Step 1: Adjust the ISO first
When you’re shooting a series of photos in a consistent environment, there’s no need for you to constantly play around with the ISO.
Before you begin shooting, determine the ISO first (remember, the lower the better). A bright environment with plenty of light might just need an ISO of 100 or 200. Whereas an indoor environment would be 400 to 600, and night photography would require 800+.
Step 2: Figure out what you want to capture
Next, you would want to think about your subject. If it’s landscape, you would want to keep as much in focus, but still allow more light and details. In this case, choose an f16. Or if you wanted to create a narrow depth of field like a macro photo, you would have a wider aperture (like f1.8). Then, you would adjust the shutter speed accordingly.
Sometimes with moving objects, you might approach this the other way, thinking about shutter speed first before playing around with the aperture. Take a runner for example. If you wanted to capture them frozen, then you would need a faster shutter speed. Whereas if you wanted to create blurs from their movements, then you’d choose a slower shutter speed.
If changing the aperture and shutter speed isn’t creating the desired effect you want, you might need to go and adjust the ISO to a larger or smaller number. This allows you to play with your shutter speeds and aperture to help you get the desired result.
Now, these aren’t step you must follow every time, but it’s a good start for beginners. Adjusting the settings might be confusing initially, but lots of practice will have you turning those setting dials like a pro in no time.
Happy Shooting,
Kev
What Goes Through a Photographers Mind? Todays photographer is Alan McBride
Today's photographer is one that I am happy I came across on Facebook... I often see his images and admire them from afar as Alan lives in France, and ALWAYS does the subject justice with his photographic talents.
Take it away Alan...

Apart from other forms of photography, what really rattles my chain is bird and wildlife photography. It's a little different than being in a studio or setting up for portrait work in that the birds and beasts don't like to be directed and hang around too long.
Take it away Alan...

Apart from other forms of photography, what really rattles my chain is bird and wildlife photography. It's a little different than being in a studio or setting up for portrait work in that the birds and beasts don't like to be directed and hang around too long.
Not always but often the shot you get will need cropping too, so for
that and the rough and ready nature of shooting birds I shoot RAW. I find that
I am nearly always ready with a fast exposure in Manual mode and then depending
on whether the bird is flying, walking, sitting against a background or
whatever, the most I need is a little tweak of one of the dials. Preferring
mostly to tweak the shutter speed. I also invariably have the aperture just
below wide open as I feel I get better results than fully open and still with a
bit of a blurred background.
With the new Canon 1Dx I am usually at a higher ISO than with the 5d Mk
ll too. This delightful lady House Sparrow was shot on the shore at
Peyriac-sur-Mer in the Languedoc-Roussillon region of France
Some other shots are on
https://www.facebook.com/AlanMcBridePhotographerWriter/photos_stream and https://plus.google.com/u/0/photos/113281442378027142435/posts?cfem=1
but
make sure you see the ones I have shot as I often share other great images and
I'd hate to be confused with some of the better guys out there!
I'm available in France
Friday, 22 February 2013
Renting Camera Gear ~ a great option

But do you have the gear to ensure you are going to come home with the photographs you want to? While most photographers have at least a 300mm telephoto, not many of us have a 500mm or longer super telephoto... but would that be awesome to have in your bag of goodies on an African safari... or even up at the cottage to photograph the water fowl?
What about a second camera? Imagine being in some remote area and your camera stops working. Without a back-up you are left with your smart phone to photograph those scenes...
Renting camera gear sometimes just makes sense... not everyone can afford to hand over $10K on a super telephoto lens or spend $2000 to $4000 on a second camera body... but renting these items for hundreds can be a viable option.
But lets not forget those of you that want to invest in new camera gear. You can read all you want, try a friends gear for 10 minutes; but without a good amount of time spent with gear, you will never get a good feel for how it gits into your style of photography.
When I want to rent gear I contact Lens Rental Canada in Ontario. If you are reading this outside of Canada there is probably rental companies in the country you live in.
Thursday, 21 February 2013
Photography Ideas for this weekend - photograph numbers

From house numbers to credit card bills, numbers infiltrate our daily lives, so a numbers photography project is a good one if you’re looking to up the number of frames you’re shooting each week. Rather than shooting any old numbers, try to make your way from 1-100. Don’t be afraid to get creative and make some of the number formations yourself – the only limit is your imagination.
The new Nikon D7100

Superior Clarity and Nimble Precision: The DX-Format Nikon D7100 Embraces The Advanced Enthusiast With Intuitive Engineering
Nikon’s DX-format Flagship Provides Agility, Amazing Image Quality and Wireless ConnectivityMelville, NY (February 20, 2013) – Nikon Inc. today announced the D7100, the HD-SLR that ushers in a new era of DX-format image quality and functionality for the experienced shooter and photo enthusiast. The lightweight Nikon D7100 has an impressive array of intuitive features and controls bolstered by rapid performance and a robust feature set that includes a new 24.1-megapixel CMOS sensor, Nikon's 51-point AF system and wireless connectivity.
"Solidifying Nikon's ongoing commitment to the DX-format D-SLR customer, the innovative D7100 provides new ways for photographers to capture their creative vision with incredible detail and precision, whether through still images or HD videos," said Bo Kajiwara, Vice President of Marketing, Planning and Customer Experience, Nikon Inc. "The D7100 blends the best creative features with advanced-level functionality to give the enthusiast exactly what they want and that's a great shooting experience before, during and after capture, from shooting to sharing."
Engineered for Exceptional Image Quality
At the core of the Nikon D7100 is a new 24.1-megapixel DX-format CMOS sensor, designed to render the truest, most detail-rich images possible and brilliant HD video. The innovative sensor design delivers the ultimate in image quality by defying convention; because of the high resolution and advanced technologies, the optical low pass filter (OLPF) is no longer used. Using NIKKOR lenses, the resulting images explode with more clarity and detail to take full advantage of the 24.1-megapixel resolution achieved with D7100's DX-format CMOS sensor.
Driven by Nikon's exclusive EXPEED 3 image processing engine, the D7100 realizes a focus on image quality that extends beyond staggering sharpness to outstanding images with a wide dynamic range in a variety of lighting conditions. A wide ISO range of 100-6400 (expandable to Hi-2 of 25,600) allows for more versatile shooting to capture challenging conditions such as nature at twilight or even sports under less-than-ideal lighting. Even at higher ISOs, noise is minimized for both still images as well as when recording HD video.
Performance and Features Geared for the Advanced User
The Nikon D7100 is designed for the experienced shooter ready to take their photography to the next level, who demands a camera that conveys reliability and performance, and who is eager to embrace the next photographic challenge. These features include:
New 51-Point AF System - The D7100 features Nikon's professionally proven and lightning-fast 51-point AF system, with a new Multi-CAM 3500DX AF module. Additionally, the AF system and exposure are augmented with Nikon's 3D Color Matrix Metering II 2,016 pixel RGB sensor and Scene Recognition System, which recognizes the scene prior to shooting in order to adjust AF, AE, AWB and other parameters. The results of this system are accurate and even exposures, sharp details and vivid color, frame after frame. For additional precision, 15 of the 51 AF points are cross-type, and the center point is functional at f/8, giving DX photographers an additional telephoto advantage when using a teleconverter.

Rapid Response and Operation - To help ensure the decisive shot is not missed, the D7100 can shoot at up to six frames per second (fps) at full resolution and up to seven fps when using the new 1.3x crop mode at slightly reduced resolution. Overall operation and image processing is swift, while startup and shutter lag is nearly imperceptible with a release time lag of 0.052 s* (CIPA). Image data is also written to dual SD card slots, which accept the latest high-speed UHS-1 and SDXC cards.
1.3x Crop Mode - Sports photographers take note: Building upon the telephoto benefits of the DX-format, the D7100 has the unique ability to shoot in a 1.3x DX crop mode for both stills and HD video. While in this innovative mode, shooters will gain an extra telephoto boost (2X), and a boost in burst speed to seven fps, with 15.4- megapixel resolution. Additionally, while in this mode, the 51-point AF array covers more of the frame, allowing improved subject acquisition and tracking performance through the viewfinder.
New High Resolution LCD - The new, wide and bright LCD screen is 3.2-inches and features a super high resolution of 1,229K dots. Now photographers can easily compose and check critical focus for HD video.
New Viewfinder - Nikon has implemented a bright and high-contrast new OLED data display within the optical viewfinder that makes it easier to read and see shooting data. When composing through the viewfinder, users see 100% frame coverage, essential for proper framing.
Spot White Balance - A new feature for Nikon cameras, Spot White Balance allows for quick and precise white balance adjustment while shooting in live view. By selecting a desired point on the screen, users can set a custom white balance from a distance, even while using a super-telephoto lens. This is helpful for shooting video or when shooting under unfamiliar lighting when no gray card is available.
Durable Construction - Built to perform in a wide variety of conditions, the D7100 is built to the same moisture and dust resistance specifications of the venerable Nikon D300S. For durability, the top and rear covers are constructed of magnesium alloy, while internally, the shutter has been tested to withstand 150,000 cycles. Despite its robust construction, the camera remains lightweight, weighing in at approximately 1.5 pounds (body).
Enhanced Interface - To make it easier for users to quickly access frequently used functions, the "i" button has been added to the enthusiast-oriented control layout on the camera.

Photographers know that moment when the shutter clicks and they have created something stunning which deserves to be shared. No matter where that moment occurs, whether in an urban landscape or isolated forest, they can now share their images wirelessly by an attached WU-1a Wireless Mobile Adapter.1 With this optional adapter the user has the ability to share images to a supported smartphone or tablet, shoot remotely from their device, and transfer photos from up to 49 feet away. The Nikon Wireless Mobile Utility application is available free of charge on Google Play™ for Android™ devices or from the App Store™. When using the application, photographers can wirelessly transfer images from the camera to a mobile device and even remotely control the camera.
Capture Exceptional HD Video
For those looking to create multimedia content, the Nikon D7100 has a wide variety of innovative features for capturing HD video at various frame rates. With a press of the dedicated video record button, video can be recorded at 1080/30p, or at 60i/50i (in 1.3x Crop Mode) for optimal playback on many HDTV's when connected via HDMI. The D7100 also provides the ability to record stereo sound through the internal microphone, or attach an optional external microphone such as Nikon's ME-1, through the dedicated microphone terminal. To reference audio, the camera also features a headphone terminal. Users can also get creative using Nikon's Creative Effects in real time. This feature lets users take advantage of modes like Selective Color or Color Sketch to create truly customized movies.
Full Control, Creatively
In addition to full manual controls, the Nikon D7100 features a variety of intelligent modes to create effects and special features so that users can unleash their creativity. Nikon's Picture Controls can be applied to photo and video to change the color, tone and saturation of an image for creative control. When capturing still images, the same Creative Effects modes and filters available in video are also at the disposal of the user. By combining consecutive frames, the D7100 also has a high dynamic range (HDR) function to let users capture photos with a vast tonal range.
NIKKOR, Speedlight and System Compatibility
For 80 years, the NIKKOR legacy has been providing world renowned optics for photographers. The D7100 is compatible with Nikon's dedicated DX-format lenses and more than 50 FX-format lenses. NIKKOR lenses offer the ultimate in sharpness and clarity in photos and HD video. For added versatility, the camera features a built-in flash, or can act as a commander in Nikon's popular Creative Lighting System (CLS).
WR-1 Transceiver
In addition to the D7100, Nikon also announced the WR-1 Transceiver for Nikon D-SLR cameras. This device uses 2.4 GHz radio frequency for maximum range when communicating with the camera, extending the range and functionality2 for remote shooting applications. The communication range between WR-1 units is approximately 394 feet3, and 15 channels are available. Users also have the ability to remotely control a camera (with a WR-1 used as a receiver) attached by operation of another WR-1 (used as a transmitter), and also perform simultaneous or synchronized release of shutters on several cameras using the WR-14. Furthermore, there are a wide variety of options for remote shooting, which include dividing remote cameras into groups and controlling each group separately and interval timer photography. Remote shooting by combining the WR-1 with WR-R10/WRT10 wireless remotes is also possible.
Price and Availability:
The Nikon D7100 will be available starting in March 2013 for the suggested retail price (SRP) of $1599.95* with the AF-S DX NIKKOR 18-105mm f/3.5-5.6 VR lens or $1199.95+/- for the body only configuration. Additionally, the new MB-D15 battery grip and the WR-1 transceiver will also be available in March 2013, and pricing for these products is not yet announced. The WU-1a Wireless Mobile Adapter is currently available and has a suggested retail price (SRP) of $59.95.
Wednesday, 20 February 2013
Vanity URL's - a marketing strategy for photographers
What is a Vanity URL?
Some web services are built with default vanity URLs, which means that whatever username you create during the registration process will become the base of your vanity URL. Twitter is an example of this, so your Twitter name becomes your Twitter vanity URL, which looks like http://twitter.com/twittername.
What’s the Point?
For photographers, vanity URLs should play an important part of your web and social media strategies. You’ll have to decide what your default username will be, but it should be your company, the name of a product or service you offer, or something directly associated with the company. The bottom line is that your social presence, by way of vanity URLs, can greatly improve your branding across the web.
Depending on the size of your company and the types of products you offer, you may consider having an online presence with a username/vanity URL for each product or service you offer.
Vanity URLs to Grab
Facebook has vanity URLs for profiles and pages, so you’ll want to claim your company name should you plan to leverage the social media marketing potential of Facebook Pages. You’ll also want to verify that someone else hasn’t already claimed your trademarked name.
As Twitter becomes a more effective way to promote your business, you’ll want to make sure you secure your Twitter name of choice now.
If you’re thinking about using video for tutorials, how-tos, or other business objectives. Both YouTube and Vimeo support vanity URLs, so you’d be wise to lock down the same username there as you do on other social sites.
Of course there are hundreds of other sites that support vanity URLs, so the important thing to keep in mind is to remain consistent and remember that the social content you publish can really improve the SEO for searches on your company name or products.
Tuesday, 19 February 2013
"Street Photography" techniques

This type of photography tends to place the photographer at a distance from its subject matter, and often concentrates on a the human moment; catching a moment in time if you will. On the other hand, a lot of street photography takes the opposite approach and provides an extremely personal rendering of the subject matter. This gives the audience a more up-close and experience of daily life.
The key to successful street photography is to blend into the surroundings in the attempt to not draw attention to yourself and the camera hanging around your neck. People use most kinds of portable cameras for street photography, digital SLRs, point and shoot cameras and now smart phones.
A commonly used focusing technique is called “zone focusing”. This is where you set a fixed focal distance on your camera and shoot from that distance only. This is used as an alternative to autofocus, particularly using wide angle lenses with their increased depth of field. Zone focusing facilitates shooting "from the hip" i.e. without bringing the camera up to the eye. Alternatively, todays swivel view finders allow for composing the shot and/or adjusting focus without bringing attention to the photographer.
Some people "zone focus" at a fixed focal length, while others set the focus on manual and set the focal distance to "infinity".
If you are shooting homeless people, and you do not want to intimidate them, leave the DSLR at home and take a point and shoot. A DSLR camera screams, "I am taking photos of you" and will intimidate any potential subject matter, it may also entice them to want to take that camera from you. A point and shoot is less intimidating and a lot easier to give up if a desperate homeless person decides they want that camera.
 So now that I laid out the ground rules and gave you some general rules to follow, here are a few quick tips to follow while out on your street photography adventure...
 1 – Keep moving. If you stand still you will bring attention to yourself and your camera.
2 – Do not hesitate. Take the shot. How many times have you wished you clicked the shutter and didn’t. This is amplified in street photography. Everything moves so fast on a busy street that if you are not clicking, you’re missing the action.
3 – Don’t look like a professional. A trick is to fiddle with your camera, look like you are making adjustments and click the shutter while in manual focus at a fixed focal length. People will be caught off guard and not know you are taking their photo because they will think you are fiddling with your camera.
4 - Always have our camera in your hand and ready to shoot. Don’t just have your camera around your neck or in your pocket, which can cause a delay in you shooting. If your camera isn’t in your hand, you’re not ready to take a photo.
You can always join us on the ultimate street photography workshop in Paris, France. See details of these workshops here.
Workshop #1 in Paris
Workshop #2 in Paris
Safe and Happy Shooting,
Kev
Monday, 18 February 2013
Paris has the reputation of being the most beautiful and romantic of all cities

Paris has the reputation of being the most beautiful and romantic of all cities, brimming with historic associations and remaining vastly influential in today's culture, art, fashion, and design. Dubbed the City of
A large part of the city, including the River Seine, is a UNESCO World Heritage Site and is just begging to be captured through your camera lens. The city contains numerous iconic landmarks, such as the world's most visited tourist sites the Eiffel Tower , the Arc de Triomphe, the Notre-Dame Cathedral, the Louvre Museum
And once you arrive, you will soon discover (as so many others before you have) that
In September of 2014 I am returning for my 7th visit, but this time I have the honor of spending it with two of best photographers of our time, Denise Ippolito and Deborah Sandidge.
Together, we will be running two, one week workshops These workshops are designed to introduce you to the city, its iconic structures and its culture. We have planned an itinerary that will take you through the Parisian labyrinth to see the stunning buildings, gardens and cityscape vistas at the best time of day and night to photograph them.
In week one, students will have the opportunity to learn from Deborah's artistry and her long exposure cityscape photography, photography that can only be described as masterful. Her photographic and digital darkroom abilities are perfectly matched forParis
During the second week, students will have the opportunity to learn both photographic and editing techniques from the very talented, Denise Ippolito. Denise's reputation as one of today's best photographic workshop leaders is well respected, and her students often walk away from her workshops having all of their photographic and editing expectations surpassed.
In week one, students will have the opportunity to learn from Deborah's artistry and her long exposure cityscape photography, photography that can only be described as masterful. Her photographic and digital darkroom abilities are perfectly matched for
During the second week, students will have the opportunity to learn both photographic and editing techniques from the very talented, Denise Ippolito. Denise's reputation as one of today's best photographic workshop leaders is well respected, and her students often walk away from her workshops having all of their photographic and editing expectations surpassed.
We will be headed to Paris Paris
Our days will start in the bohemian district of Montmarte... from there we will travel as a group to various locations so that you can experience all that Paris
One other advantage of attending our workshop is that your spouse can come along at no cost if he or she is not a photographer. They can come on our walks or sleep in and enjoy a leisurely day, meeting up with us upon our return.
I hope you consider joining our workshop. We will learn a lot of new skills, but most of all enjoy ourselves together in Paris
To see more information on our workshops, please visit the following links...
Week One with Deborah Sandidge
Week Two with Denise Ippolito
How did the Professional Photographer Take That Photo - Todays Photographer is Deborah Sandidge
Today's photographer is one of those professional photographers that I always make the time to look at her images when she posts them... and I love when she travels... we get to see images from some great locations as seen through Deb's eyes...
Today Deborah shares with us some of her photos from a recent trip to London... and as always, they are great... and inspiring...
Take it away Deborah
One of the fascinating
aspects of photography is the ability of the photographer to convey the passage
of time, or create a sense of motion through the art and technique of long
exposure. You can create beautiful long exposure images at the edge of night
and beyond, and capture surreal photos during the brightness of day. With the
use of neutral density filters, you can calm the crashing waves of an ocean,
softly blur clouds across the sky, and create the impression of emptiness on
busy walkways and streets. Everything changes, the reality, the mood, and the
drama of a composition, and allows you to create expressive, fine art
imagery.

For example, when I traveled to London
recently, everyone including me photographed iconic subjects such as the London
Eye. It’s a fascinating structure, and barely seems to move. With a little
creative effort and the use of a 10 stop neutral density filter, I was able to
create a sense of motion and convey the passage of time. The extended exposure
of 113 seconds gives the photo a creative edge over many travel pictures making
it more artistic. Long exposure photography requires more time, effort, and
patience, however it’s rewarding to come away with a unique and beautiful photograph
that is the result of an extended exposure.
 Here’s how you do it— To blur clouds and
water, and capture a subject in motion, you’ll need a sturdy tripod, cable, or
remote release, and a 10 stop neutral density filter such as the Lee Big
Stopper or Singh-Ray Mor-Slow. Much like using an infrared filter on the lens,
compose, meter and focus first. You can calculate exposure for the 10 stop
neutral density filter based on metered exposure using an app such as NDTimer
or Long-time. Ideally, something needs to be moving in the composition to create
a compelling long exposure image. The London Eye Ferris wheel or clouds moving
through the scene in the photo below of Tower Bridge in London make
eye-catching images. Ocean waves crashing over rocks can create a softened,
ethereal scene or rippled water in a lake can become magically smooth—your
opportunities are endless!
Here’s how you do it— To blur clouds and
water, and capture a subject in motion, you’ll need a sturdy tripod, cable, or
remote release, and a 10 stop neutral density filter such as the Lee Big
Stopper or Singh-Ray Mor-Slow. Much like using an infrared filter on the lens,
compose, meter and focus first. You can calculate exposure for the 10 stop
neutral density filter based on metered exposure using an app such as NDTimer
or Long-time. Ideally, something needs to be moving in the composition to create
a compelling long exposure image. The London Eye Ferris wheel or clouds moving
through the scene in the photo below of Tower Bridge in London make
eye-catching images. Ocean waves crashing over rocks can create a softened,
ethereal scene or rippled water in a lake can become magically smooth—your
opportunities are endless!
Thanks Deborah... to find Deborah on the web, please see the following links...
Gplus.to/debsandidge
If you want to join Deborah and I, we are running a few workshops together.
Paris in September 2014 and Morocco in March 2014
If you want to join Deborah and I, we are running a few workshops together.
Paris in September 2014 and Morocco in March 2014
Saturday, 16 February 2013
What Camera gear am I taking on my African Safari to Tanzania?
 "The number one question I get when someone registers for an
African Safari is….. “What cameras or lenses should I bring?”
"The number one question I get when someone registers for an
African Safari is….. “What cameras or lenses should I bring?”
It’s a great question, and one that I pay close attention
to… people have different expectations, aptitudes and pocket books… If we all
could afford two full frame $5000 cameras and a 600mm f4.0 or an 800mm f4.0 we
wouldn’t ask the question. We would flip open the wallet and throw the credit
card down on the counter and say, “Hook me up!”
But that isn’t the case for most of us… we have to be
smarter with our money and get the gear that fits within our budget, but also
take the shots that are going to exceed your expectations… and that is where
this post comes in… what camera and lenses am I taking to Africa…
Camera Bodies
Nikon D7000 – a really good crop sensor camera that will give me more
focal length for my telephoto lenses, has the focus modes I want and does a
decent job in low light. This is an extremely affordable crop sensor camera
that is priced under $1000
Nikon D600 – a full frame camera that surpasses anyone’s
expectations in low light situations, does a commendable job in a motion
photograph, has all the functions a photographer would need and is extremely
affordable at right around the $2000 mark.
People often ask me why I do not shoot the higher end cameras... after all, I run workshops for a living... My answer is that I want to use the level of camera that the majority of my students shoot with. The high end crop sensor and affordable full frame cameras....
I want them to see that its practice and the six inches behind the camera is what takes that great photo, not always the more expensive camera.
Not to take anything away form the higher end cameras... if you know the functions, they have the potential to take a better photo.

Accessories for the cameras will be…
Each camera will be accompanied by a minimum of three camera
batteries with two chargers and one extension chord with three plugs to charge
multiple batteries at night if needed.
I will take at least one 8gig 400x and 600x Lexar PRO
memory card for every day that I am there. I will not generally need them when
I am leading the workshops. I do not take that many photos when leading a workshop, I am there for my clients. But, I will generally be there before the workshop
attendees arrive, or will remain after to take my own photos.
One lens cleaning / sensor cleaning kit.
Lenses
Wide Angle for landscape
Zuiko 11-22mm F4 for my Telephoto zoom lenses
Sigma 24-70mm F2.8 for my Nikon cameras
Sigma 70-200 f2.8 for my Nikon cameras
Specialty Lens
Lensbaby Composer PRO for my Nikon cameras
Longer Telephoto lenses
The new Sigma 120-300 f2.8 for my Nikon camerasSigma 150-500mm f5.0 to f6.3 form my Nikon cameras
Teleconverters
I will also have an But here is the kicker for anyone deciding on what camera gear to take on safari... there is a weight restriction on the regional flights back to the major airports... generally they are around 30lbs. While its tempting to take all your camera gear with you, be selective because you still have that tripod, laptop and clothes to pack...
I hope that helps you with your decisions. There are lots
more items to consider like tripods, bean bags, camera bags, memory backup,
rain and elemental protection gear… If you would like to learn more about those
items please email me.
and we do still have one spot on our african safari... take a look and contact me if you are interested... http://www.photographers-lounge.com/international-workshops/2013-workshops/tanzania-photo-tour/
and we do still have one spot on our african safari... take a look and contact me if you are interested... http://www.photographers-lounge.com/international-workshops/2013-workshops/tanzania-photo-tour/
Kevin
Marrakech and Sahara Desert Photo Workshop
 |
photo courtesy of Authentic Tours
|
So we are headed to
Spring, from March till May, ties with autumn as the best season
to visit Marrakesh
For photographers,
those cool spring days and nights means clean, crisp air, and most importantly,
no smog. The lack of air pollution in March seems to bring the Atlas Mountains
alive... the views across the desert, through the palm trees, framed by the
snow dipped Atlas Mountains is a vista one can only appreciate standing there
in Marrakech.
Please
consider joining us. The information on our workshop can be found here. http://www.photographers-lounge.com/international-workshops/2014-workshops/moroccan-photo-workshop/
Thursday, 14 February 2013
Photography Idea To Try This Weekend - Street Photography
You’ll need to be prepared for some rejection and to teach yourself to work quickly, as most people you encounter are likely to be busy. Challenge yourself to shoot a hundred strangers and you’ll see your work improve drastically.
Wednesday, 13 February 2013
Protecting your camera from condensation in the winter
After an outing to a butterfly conservatory I thought I would post a reminder about shooting in extreme temperatures. It was -16 Celsius with a wind chill of -22 when we left the house and we were going to be shooting in a very humid building set at 25 degrees… The first thing I thought of was “condensation”.
We don’t always shoot indoors in the winter. You see, we, as Canadians are a winter loving people… not too often will we hide away in our homes just because a cold front blows through. As photographers, that sometimes means heading outdoors to photograph the spectacular white scenes this season offers. But as I mentioned these temperatures can wreak havoc on our gear if we are not careful.
Its basic knowledge… take a cold object and put it into a warm home, condensation forms on the object. This buildup of moisture can easily rust or mold the internal elements of a digital camera body, a camera lens or a camera flash unit.
When you are out with your camera, try to keep it as warm as you can in cool conditions. Place it under your coat, or cup it inside your hands while wearing thick, insulated gloves. Never let the camera cool completely to the ambient cold air temperature.
When the outing is finished, wrap the camera in a plastic food storage bag when preparing to leave the cold environment. Seal the plastic food storage bag so the condensation forms on the interior lining of the bag, not the internal components of the camera, lens or flash unit.
Move to the warm environment. Allow the camera to stay in the plastic bag until it warms to the new surrounding temperature. Remove the camera from the protective cover carefully and look it over and make sure it is dry before turning on the power.
Wipe down the surface of the camera with a microfiber cloth, removing any visible condensation.
Your camera will also have a temperature rating. Before you venture out I would advise that you look at what temperature your camera is rated for. It will be in your manual.
Enjoy your winter shooting my fellow Canadians… and if you haven’t ad the opportunity to shoot in the snow, book a flight, we would love to have you up here photographing our spectacular wildlife and scenery.
Essential gear to take with you when you walk out the front door

A photographer headed out the front
door will always carry a backpack full of cameras and accessories with them
at all times. Heck, sometimes I head out and I feel like I am taking everything i have, including the kitchen sink with me. However, many often forget the essential non-camera related
accessories. But you should always carry these non essential accessories with
you…
Carrying electrical tape is essential for many
photo shoots. It may not seem useful at first, but consider this: you are
involved in a major photo shoot and you have to attach one of your flashes to a
tree or a railing to get the best off-camera light. Electrical tape is a simple
and temporary tool for this job.
Anything that can’t be held by electrical tape
can be held by alligator clips. These are especially useful for holding wires
away from the lens during complicated shoots.
Bring a clean towel to help wipe off your
camera lens if it rains or if mud splashes the lens.
Other
accessories you should take to every photo shoot include a pad of paper for
taking notes, pencils, a flashlight, a cell phone and some water and an energy
or granola bar….
Tuesday, 12 February 2013
Remember the tip, "f/8 and be there"

Reportage and street photography, weddings, family gatherings in the back yard are less predictable as your subjects will be moving in relation to the frame. In these circumstances, remember this tip, "f/8 and be there".
Set your aperture to f/8 for a practical, manageable balance of fairly fast shutter speeds and broad depths of field, allowing you to spend more time thinking about composition within the frame than you do about optical algebra.
When shooting indoors without a flash, and depending on the lighting conditions, you may need to increase your camera's ISO sensitivity setting at this aperture, but be careful not to push it so high that you introduce grain into your images, unless you are looking for that specific effect.
You can come on one of my composition workshops... we use this tip and others to help you take better photos. http://www.photographers-lounge.com/canadian-workshops/composition-workshops/
Sometimes the smallest things are mistaken for the simplest things
I wanted to post this today. It's a post from a good friend, Mischa Schneider. In addition to a fantastic photo that shows detail of a Milkweed Leaf Beetle foot, there is a very good message for photographers in his post.
That message is that we all need to pay attention to the smallest of details. We assume that the smallest things are not important... but in reality, the smallest of things can provide incredible detail that separates the good from the great.
Take it away Mischa...
"Sometimes the smallest things are mistaken for the simplest things. My name is Mischa and my passion is insect macro photography. Lately I have delved into high magnification macro photography. For me that is up to 10:1. Through focusing stacking multiple images we can witness nature's complexity in a whole new way. Focus stacking is a technique used to combine multiple images taken at different points of focus to increase the overall depth of field. With magnifications higher comes less DOF. For example, a single image taken at 2:1 (on sensor) at a nominal aperture of f/8 will have a DOF of less than 0.5mm.
Here is a 10:1 shot of a Milkweed Leaf Beetle foot. Compare the finished product to 1 out of the 97 images need to compile the final image."


Here are the specs on the final image.
Canon EOS 5D mark 2 with Nikon M Plan 10x 0.25 160/- CF objective lens on bellows.
97 images with 12µm steps between images. Total DOF around 1.2mm.
One flash through DIY diffuser as the light source.
Mischa Schneider
Absorbed Photography
www.absorbedphotography.com
That message is that we all need to pay attention to the smallest of details. We assume that the smallest things are not important... but in reality, the smallest of things can provide incredible detail that separates the good from the great.
Take it away Mischa...
"Sometimes the smallest things are mistaken for the simplest things. My name is Mischa and my passion is insect macro photography. Lately I have delved into high magnification macro photography. For me that is up to 10:1. Through focusing stacking multiple images we can witness nature's complexity in a whole new way. Focus stacking is a technique used to combine multiple images taken at different points of focus to increase the overall depth of field. With magnifications higher comes less DOF. For example, a single image taken at 2:1 (on sensor) at a nominal aperture of f/8 will have a DOF of less than 0.5mm.
Here is a 10:1 shot of a Milkweed Leaf Beetle foot. Compare the finished product to 1 out of the 97 images need to compile the final image."

one of a total of 97 images used to make the final photo below

the final image that took a total of 97 images
Here are the specs on the final image.
Canon EOS 5D mark 2 with Nikon M Plan 10x 0.25 160/- CF objective lens on bellows.
97 images with 12µm steps between images. Total DOF around 1.2mm.
One flash through DIY diffuser as the light source.
Mischa Schneider
Absorbed Photography
www.absorbedphotography.com
Thanks Mischa... click on this link here to see all the final images of Mischa's insect photos... the details are amazing. http://www.absorbedphotography.com/Animals/Pages/Macro_Stacks.html
Monday, 11 February 2013
How did the Professional Photographer Take that Image? ~ today's photographer is Danny Bailey
Today's photographer is another local photographer near me, Danny Bailey. Danny has been taking photos for over 30 years and travelled to more countries than anyone I know. But Danny is not only a talented photographer, but an extremely well spoken educator of the art of photography and videography and an accomplished videographer. Some of you may have seen the TV show "photo X plorer" or watch Motoring television... well Danny is the man behind the camera for those television programs..
And if you are ever talking to him, ask him about his time with the Rolling Stones...
Take it away Danny...
With the recent snowfall in Ontario I couldn't wait but to get up at the crack of dawn to go exploring and shooting. Not normally a landscape photographer I thought my motive would be subtle HDR. The trick here was to shoot as fast a shutter speed as possible since my subject was moving.
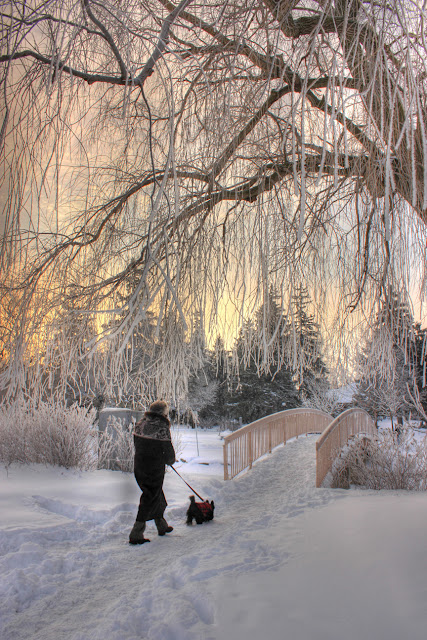
And since my aim was to shoot HDR I wanted to have a large enough aperture setting to add to my depth of field. Luckily everything came together in a matter of seconds. By already being prepared for the shot I simply composed where I thought the patron would walk and captured the images in continuous shooting mode.
Photomatix was used for processing along with Photoshop Elements 10.
Camera - Canon T2i
Focal Length - 18 mm
Aperature - F10
Shutter Speed - 1/200 "
Manfrotto Tripod
Shutter Released by cable
Thanks Danny! You can catch more of Danny's work at http://www.dannybailey.ca
Subscribe to:
Posts (Atom)